Hello world!
- January 15th, 2019
- Write comment
Migrated to Lightsail! w00t!
I use openssl’s s_client option all the time to verify if a certificate is still good on the other end of a web service. So I figured I’d put a couple of common options down on paper for future use.
openssl s_client -connect www.google.com:443 #HTTPS
openssl s_client -starttls ftp -connect some_ftp_server.com:21 #FTPES
openssl s_client -starttls smtp -crlf -connect smtp.gmail.com:25     #SMTP
openssl s_client -starttls smtp -crlf -connect smtp.gmail.com:587    #SMTPS
openssl s_client -starttls imap -crlf -connect some_imap_server:143  #IMAP
openssl s_client -connect imap.gmail.com:993     #IMAPS
openssl s_client -connect pop.gmail.com:995      #POPS
You can use the…
-showcerts
..option to display the entire certificate chain which is useful for validating your intermediates.
You’ll also get an official “Verify return code” which can be used to diagnose any SSL/TLS issues. Here’s a quick list of common return codes:
(I blatantly grabbed this from here!)
Error Code |
Error Text |
Description |
| 0 | Ok | The operation was successful. |
| 2 | Unable to get issuer certificate | The issuer certificate of a looked up certificate could not be found. This normally means the list of trusted certificates is not complete. |
| 3 | Unable to get certificate CRL | The CRL of a certificate could not be found. |
| 4 | Unable to decrypt certificate’s signature | The certificate signature could not be decrypted. This means that the actual signature value could not be determined rather than it not matching the expected value, this is only meaningful for RSA keys. |
| 5 | Unable to decrypt CRL’s signature | The CRL signature could not be decrypted. This means that the actual signature value could not be determined rather than it not matching the expected value. Unused. |
| 6 | Unable to decode issuer public key | The public key in the certificate SubjectPublicKeyInfo could not be read. |
| 7 | Certificate signature failure | The signature of the certificate is invalid. |
| 8 | CRL signature failure | The signature of the certificate is invalid. |
| 9 | Certificate is not yet valid | The certificate is not yet valid. the notBefore date is after the current time. |
| 10 | Certificate has expired | The certificate has expired. that is the notAfter date is before the current time. |
| 11 | CRL is not yet valid | The CRL is not yet valid. |
| 12 | CRL has expired | The CRL has expired. |
| 13 | Format error in certificate’s notBefore field | The certificate notBefore field contains an invalid time. |
| 14 | Format error in certificate’s notAfter field | The certificate notAfter field contains an invalid time. |
| 15 | Format error in CRL’s lastUpdate field | The CRL lastUpdate field contains an invalid time. |
| 16 | Format error in CRL’s nextUpdate field | The CRL nextUpdate field contains an invalid time. |
| 17 | Out of memory | An error occurred trying to allocate memory. This should never happen. |
| 18 | Self signed certificate | The passed certificate is self signed and the same certificate cannot be found in the list of trusted certificates. |
| 19 | Self signed certificate in certificate chain | The certificate chain could be built up using the untrusted certificates but the root could not be found locally. |
| 20 | Unable to get local issuer certificate | The issuer certificate could not be found. this occurs if the issuer certificate of an untrusted certificate cannot be found. |
| 21 | Unable to verify the first certificate | No signatures could be verified because the chain contains only one certificate and it is not self signed. |
| 22 | Certificate chain too long | The certificate chain length is greater than the supplied maximum depth. Unused. |
| 23 | Certificate revoked | The certificate has been revoked. |
| 24 | Invalid CA certificate | A CA certificate is invalid. Either it is not a CA or its extensions are not consistent with the supplied purpose. |
| 25 | Path length constraint exceeded | The basicConstraints pathlength parameter has been exceeded. |
| 26 | Unsupported certificate purpose | The supplied certificate cannot be used for the specified purpose. |
| 27 | Certificate not trusted | The root CA is not marked as trusted for the specified purpose. |
| 28 | Certificate rejected | The root CA is marked to reject the specified purpose. |
| 29 | Subject issuer mismatch | The current candidate issuer certificate was rejected because its subject name did not match the issuer name of the current certificate. Only displayed when the -issuer_checks option is set. |
| 30 | Authority and subject key identifier mismatch | The current candidate issuer certificate was rejected because its subject key identifier was present and did not match the authority key identifier current certificate. Only displayed when the -issuer_checks option is set. |
| 31 | Authority and issuer serial number mismatch | The current candidate issuer certificate was rejected because its issuer name and serial number was present and did not match the authority key identifier of the current certificate. Only displayed when the -issuer_checks option is set. |
| 32 | Key usage does not include certificate signing | The current candidate issuer certificate was rejected because its keyUsage extension does not permit certificate signing. |
| 50 | Application verification failure | An application specific error. Unused. |
Additional links:
https://www.openssl.org/docs/apps/s_client.html
Well, I haven’t written anything in a while so I figured I’d put this into WP. I recently upgraded a couple of my iOS devices to 8.4 and sure enough, I couldn’t send emails. Come to find out, my services at home were using weaker DH encryption and I needed to fix them if I wanted to send email ever again from my iPhone.
First I worked on sendmail. I needed to first create a DH 2048 bit file using openssl:
openssl dhparam -out dh_2048.pem -2 2048
This produced a file in my /etc/pki/tls/certs folder which I can now configure sendmail.mc to use via adding this line:
define(`confDH_PARAMETERS', `/etc/pki/tls/certs/dh_2048.pem')
Next you can do a ‘make -C /etc/mail’ or simply restart sendmail as it will detect the changes and do it for you (did for me at least.) Email was now working as expected and I’m no longer seeing this in my /var/log/maillog folder:
Aug 1 11:01:10 Sauron sendmail[11796]: t71F0eh9011796: 89.sub-70-197-133.myvzw.com [70.197.133.89] did not issue MAIL/EXPN/VRFY/ETRN during connection to MTA
Aug 1 11:01:11 Sauron sendmail[11803]: STARTTLS=server, error: accept failed=0, SSL_error=5, errno=0, retry=-1
Aug 1 11:01:11 Sauron sendmail[11803]: t71F1Ae8011803: 89.sub-70-197-133.myvzw.com [70.197.133.89] did not issue MAIL/EXPN/VRFY/ETRN during connection to MTA
Aug 1 11:01:11 Sauron sendmail[11804]: STARTTLS=server, error: accept failed=0, SSL_error=5, errno=0, retry=-1
Aug 1 11:01:11 Sauron sendmail[11804]: t71F1BBU011804: 89.sub-70-197-133.myvzw.com [70.197.133.89] did not issue MAIL/EXPN/VRFY/ETRN during connection to TLSMTA
Now to take a look at Apache. I’m using an older version, I think 2.2.3-91 w/ CentOS so there’s only so much I can do regarding MITM attacks apparently. But I can explicitly tell Apache to NOT use weaker encryption protocols even though I can’t use the SSLOpenSSLConfCmd DHParameters “{path to dhparams.pem}” option and specify my DH key.
Here’s what I did put in my ssl.conf file:
SSLProtocol all -SSLv2 -SSLv3
SSLCipherSuite ECDHE-RSA-AES128-GCM-SHA256:ECDHE-ECDSA-AES128-GCM-SHA256:ECDHE-RSA-AES256-GCM-SHA384:ECDHE-ECDSA-AES256-GCM-SHA384:DHE-RSA-AES128-GCM-SHA256:DHE-DSS-AES128-GCM-SHA256:kEDH+AESGCM:ECDHE-RSA-AES128-SHA256:ECDHE-ECDSA-AES128-SHA256:ECDHE-RSA-AES128-SHA:ECDHE-ECDSA-AES128-SHA:ECDHE-RSA-AES256-SHA384:ECDHE-ECDSA-AES256-SHA384:ECDHE-RSA-AES256-SHA:ECDHE-ECDSA-AES256-SHA:DHE-RSA-AES128-SHA256:DHE-RSA-AES128-SHA:DHE-DSS-AES128-SHA256:DHE-RSA-AES256-SHA256:DHE-DSS-AES256-SHA:DHE-RSA-AES256-SHA:AES128-GCM-SHA256:AES256-GCM-SHA384:AES128-SHA256:AES256-SHA256:AES128-SHA:AES256-SHA:AES:CAMELLIA:DES-CBC3-SHA:!aNULL:!eNULL:!EXPORT:!DES:!RC4:!MD5:!PSK:!aECDH:!EDH-DSS-DES-CBC3-SHA:!EDH-RSA-DES-CBC3-SHA:!KRB5-DES-CBC3-SHA
SSLHonorCipherOrder on
Which will at least help for now.
Here’s a couple of useful links:
https://weakdh.org/sysadmin.html
http://serverfault.com/questions/700655/sendmail-rejecting-some-connections-with-handshake-failure-ssl-alert-number-40
http://weldon.whipple.org/sendmail/wwstarttls.html
http://serverfault.com/questions/693241/how-to-fix-logjam-vulnerability-in-apache-httpd
http://appleinsider.com/articles/15/07/10/how-to-resolve-mail-smtp-errors-in-os-x-10104-and-ios-84
This is the second part of our Office 365 migration issues in hopes someone will find it helpful. When we were upgraded previously from the 2007 series of software to the 2010 series I had to make some changes to AD groups so they wouldn’t show up in Microsoft’s BPOS admin portal. Back then, they filtered your AD security groups in 3 different ways.
SecurityEnabledGroup objects are filtered if:
So I went about adding bogus email addresses to all of the groups that were showing up (roughly 50 or so.) No biggie, it worked….back then!
Now that I’ve upgraded to Windows Azure Dirsync w/ password sync, all of those groups that I painstakingly modified so they would be filtered out of BPOS now are imported automagically as “MailEnabled Security Groups” YAY! Needless to say, I didn’t want them to appear in the GAL so I had to take some steps to get them out of Office 365.
Now Office 365 filters SecurityEnabledGroups like so…
SecurityEnabledGroup objects are filtered if:
And that’s it!
Like I said previously, my big concern was removing them from the GAL so I went back through my AD Groups and removed all of the bogus email addresses and figured I was done. Not so fast! Upon the next sync, all of those groups were still present in the GAL but their email address’s had changed from SomeBogusGroup@example.com to SomeBogus@EXAMPLE.onmicrosoft.com . Because the groups were still considered MailEnabled Security Groups, Office 365 reverts them back to your default domain email address and also changes the first half of the email address, the local part, to match the group name. Example: I gave the AD group “AccountingOnly” an email address of accountonlygroup@example.com. This way I knew I won’t have to worry about duplicate email addresses. When I removed the email address from AD, Office 365 filled it in with accountonly@EXAMPLE.onmicrosoft.com. Bottom line, it was still showing up in the GAL and I wanted it gone. So, I had to do it via PowerShell like so.
Connect-MsolService
Get-MsolGroup -ALL
This showed me all of the groups I had in Office 365. You can see the AD groups Dirsync uploaded as MailEnabledSecurity groups along with other groups that didn’t have an email address which appeared as just Security groups and also Distribution List groups. After scouring the MailEnabledSecurity groups to make sure they were all the ones I wanted gone, I simply did…
Get-MsolGroup -GroupType MailEnabledSecurity | Remove-MsolGroup -Force
This way I wasn’t being prompted to yes/no/suspend the operation for each one.
Once that was done, I changed the registry HKLM\SOFTWARE\Microsoft\MSOLCoExistence key “FullSyncNeeded” to 1 and issued a PS command of Start-OnlineCoexistenceSync which made it do another Dirsync right then. Surprisingly, the AD groups I just removed weren’t showing back up in Office 365 right away. It took another full Dirsync about 24+ hours later for all of the groups that were removed to show back up and this time they showed up as only Security groups not MailEnabled Security groups.
Also, if you’re like me, you’ll want to watch the Dirsync as it’s happening so open up your miisclient.exe which can be found in C:\Program Files\Windows Azure Active Directory Sync\SYNCBUS\Synchronization Service\UIShell directory.
Here’s a bunch of links for more info:
http://support.microsoft.com/kb/2256198#How (MS’s website which shows how Azure does its’ filtering. To me, this isn’t accurate any longer.)
http://community.office365.com/en-us/wikis/sso/filter-support-in-the-microsoft-online-services-directory-synchronization-tool.aspx (Office 365 wiki link which shows how it filters now. Here you can clearly see they’ve changed filtering.)
http://community.office365.com/en-us/wikis/sso/default.aspx (Same Office 365 wiki but the main Directory Integration Services area.)
http://community.office365.com/en-us/wikis/sso/office-365-dirsync-content-map.aspx (Main Dirsync content map page.)
http://support.microsoft.com/kb/2508722 (KB page on “Mail-enabled groups that have an email address aren’t synchronized to Office 365” why couldn’t I have THAT problem!)
http://support.microsoft.com/kb/2709902 (KB page on “Object that’s deleted from the on-premises Active Directory isn’t removed from Windows Azure AD after directory synchronization” talks about using PowerShell to remove them from Office 365 manually.)
http://technet.microsoft.com/en-us/library/jj151771.aspx#BKMK_SynchronizeDirectories (Force Dirsync page via PowerShell.)
http://technet.microsoft.com/en-US/library/dn194137.aspx (TechNet page on the Remove-MsolGroup PowerShell command.)
http://www.amdocorp.com/Pages/Removedeletedmailbox.aspx ( Alian’s page which shows using pipes FTW!)
http://technet.microsoft.com/en-us/library/dn194130.aspx (TechNet page on Get-MsolGroup PowerShell command. This command didn’t play nice for some reason when I used it.)
At work we use Microsoft’s Cloud offering called Office 365. We were one of the early adopters and signed on with BPOS back in 2010 ish time frame. Even back then, they had an Active Directory Sync tool and each time we were upgraded from 2007 toolset -> 2010 toolset to now 2013 toolset we had to tweak our AD Sync tool to keep our GAL clean of disabled or service accounts. This wasn’t an easy feat initially but I was pointed in the right direction by MessageOps.com and have since managed to reapply the same filtering technique for Office 365’s new Dirsync tool called Windows Azure Directory Sync. We were pressed into upgrading our dirsync tool because they started blocking as of Oct. 1st 2013 the previous tool due to it being A) 32 bit and B) Microsoft Identity Lifecycle Manager 2007 fp1 at its core. They’ve now got us using Forefront Identity Manager 2010 R2 which has password synchronization! Yay! I managed to hold off implementing ADFS just long enough for Microsoft to find an easier way for our users to start using Same Sign-On.
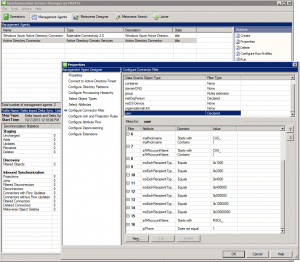
So, how do you configure the new Dirsync tool so it won’t send every single AD User Object into Office 365? By filtering your Active Directory Connector Management Agent using miisclient.exe.
1) Open up your miisclient.exe and go to the Management Agents option.
2) Next, right-click your Active Directory Connector listed under Management Agents and select properties.
3) Now select Configure Connector Filter and scroll down on the right-hand side until you find User. Here the user filter is declared thankfully so we can tweak it the way we want (unfortunately group is a Rules Extension which has changed and will be addressed in Part 2 of the write up.)
4) While user is selected, and you can see the 15 different filters for users, select “New…” across the bottom and create a filter appropriate for your organization. For ours, we selected attribute = ipPhone, Operator = Does not equal and Value = 1. This way, it will only synchronize AD User Objects that have their ipPhone = 1 on their AD properties page (this way I don’t have to use ADSI Edit for each user w/ in our company.)
All in all, pretty straight forward. Now fixing our groups that got sucked up into Office 365 are another matter!
Here’s a couple of links I found useful regarding setting up this new filter inside Forefront Identity Manager 2010:
http://www.messageops.com/documentation/office-365-documentation/office-365-admin-training (MessageOps website. Scroll to the bottom for Dirsync.)
http://social.technet.microsoft.com/wiki/contents/articles/18096.dirsyncwindows-azure-ad-password-sync-frequently-asked-questions.aspx (Dirsync FAQ.)
http://technet.microsoft.com/en-us/library/jj710171.aspx (MS’s steps for configuring filtering on Dirsync. I chose User Attribute Based filtering since we’re a small company and it was easier.)
http://technet.microsoft.com/en-us/library/hh967629.aspx (Top level of Dirsync. useful info if this is your first time using AD sync w/ Office 365.)
http://technet.microsoft.com/en-us/library/dn246918.aspx (Windows Azure Dirsync’s password sync feature. We definitely love it.)
http://blogs.technet.com/b/educloud/archive/2013/06/03/new-azure-active-directory-sync-tool-with-password-sync-is-now-available.aspx (Announcement that Azure sync now does passwords!)
http://support.microsoft.com/kb/2855271 (Password sync troubleshooting guide.)
http://community.office365.com/en-us/wikis/manage/2567.aspx?WT.mc_id=eml_CXM__Sept+2013+Admin+Newsletter (MS’s justification for making us bump up to 64 bit.)
http://blog.baeke.info/2012/06/24/office-365-identity-management-with-dirsync-without-exchange-server-on-premises/ (general Dirsync blog)
We had an employee who had a broken installation of Office 2010 Pro Plus. We use Microsoft Online Services (now called Office 365) and in particular we use their E3 plan for most of our employees.
Simply doing a …
cd "%ProgramFiles(x86)%\Microsoft Office\Office14\"

dir *.vbs (you're looking for the OSPP.VBS file.)

cscript ospp.vbs /dstatus
(will show you something like this)
Microsoft (R) Windows Script Host Version 5.8
Copyright (C) Microsoft Corporation. All rights reserved.

---Processing--------------------------
---------------------------------------
SKU ID: ae28e0ab-590f-4be3-b7f6-438dda6c0b1c
LICENSE NAME: Office 14, OfficeProPlusSub-Subscription edition
LICENSE DESCRIPTION: Office 14, TIMEBASED_SUB channel
LICENSE STATUS:  ---LICENSED---
ERROR CODE: 4004FC04 as licensed
ERROR CODE: 0x4004FC04
ERROR DESCRIPTION: The Software Licensing Service reported that
the application is running within the timebased validity period.
Last 5 characters of installed product key: HMBFK
REMAINING GRACE: 26 days  (37247 minute(s) before expiring)
---------------------------------------
---------------------------------------
---Exiting-----------------------------

C:\Program Files (x86)\Microsoft Office\Office14>
Can show you whether or not you’ve got a problem. If you do, you can reactivate the Office subscription if yours shows —NOTIFICATIONS— for its license status by going into directory…
C:\Users\faileduser>cd "C:\Program Files (x86)\Common Files\microsoft shared\OFFICE14"
and running
osaui.exe /K or /F
via cmd with either /K to do a password reset or /F to change users or reset the subscription back to basics. You can also do a /r if you need to remove another device which is using your current subscription.
Here’s a couple of links:
http://support.microsoft.com/kb/2684927 (Very helpful! Gives the actual error codes your users will probably see!)
http://support.microsoft.com/kb/2512834 (Remove some other device from your subscription. /r will show you a list and you can see whom to remove!)
http://technet.microsoft.com/en-us/library/gg702620.aspx (General troubleshooting tips for Office 365 Pro Plus)
That damn 169.254.x.x IP address has caused me more headaches than I care to count. Here’s how I turn it off:
Seriously, you can also apply that command down @ the adapter level too. Typically when I’ve got a problem w/ APIPA I’ve got a bigger issue but can’t see it yet. As an example, once I turned off APIPA on a laptop I could see that the OS just didn’t like the static IP address I was trying to configure it with. Once I changed the IP to something different, it worked just fine. GO FIGURE!
Here’s a couple of links:
http://support.microsoft.com/kb/244268/en-us
http://support.microsoft.com/kb/220874
http://support.microsoft.com/kb/307287
http://en.wikipedia.org/wiki/APIPA
http://superuser.com/questions/482520/why-am-i-getting-a-169-ip-address-at-startup
http://www.dummies.com/how-to/content/automatic-private-ip-addressing-apipa.html
http://lyngtinh.blogspot.com/2011/12/how-to-disable-autoconfiguration-ipv4.html
I keep meaning to write down my SCST installs so the other network engineers here at work can reference how I did it all. This documentation is also for me too (well, primarily for me actually!)
Here it goes…
1. install CentOS:
a. While on Hostname screen, select “configure Network” and check “connect automatically” on your eth0 device so it will install & configure basic networking alongside NetworkManager.
b. Select the “Software Development Workstation” option then unselect groups virtualization, virtualization-client and virtualization-platform or let the installer finish then use “yum groupremove virtualization virtualization-client virtualization-platform” once you’ve booted into the OS the first time. By selecting the “Software Development Workstation” as your install type, it will pretty much install every package you’ll need to do the kernel compile.
2. Now do a yum update and reboot the box so you’re using the new kernel.
3. Install some remaining dependencies for this full kernel build:
a. yum install asciidoc
b. yum install newt-devel
c. yum install xmlto (thanks Gilbert!)
4. Commence kernel build prep.
a. Find out which kernel you’re currently using w/ “uname -r” and write it down.
b. Create user for building kernel & SCST by running “useradd mockbuild” go ahead and change from user root to that user “su – mockbuild” for the next step (no, mockbuild doesn’t need a password so don’t give it one!)
c. While as the mockbuild user, execute “mkdir -p ~/rpmbuild/{BUILD,BUILDROOT,RPMS,SOURCES,SPECS,SRPMS}” which creates the directory structures for the build and finally “echo ‘%_topdir %(echo $HOME)/rpmbuild’ > ~/.rpmmacros” which creates your .rpmmacros file w/ the build directory location. (NOTE: spacing is very important on this command. Just copy & paste to be sure you typed it correctly.)
d. Again, while as the mockbuild user, execute “rpm -i http://vault.centos.org/6.4/updates/Source/SPackages/kernel-2.6.32-358.14.1.el6.src.rpm 2>&1 | grep -v mock” which will install the current kernel source and put the files in your build tree folders (while also redirecting stderr to stdout while grepping it.)
e. While in your homedir and as the mockbuild user, execute “rpmbuild -bp –target=$(uname -m) ./rpmbuild/SPECS/kernel.spec” (that’s 2 hyphens in front of target! WP is mangling the command) so it will uncompress the kernel sources and move them to your ./rpmbuild/BUILD folder. (NOTE: While it’s running, open up another console and as root run “rngd -r /dev/urandom” as the certificates will drain out the random number generator and kind of hang the rpmbuild.)
5. Download SCST from svn & patch kernel in BUILD directory.
a. We need to grab a copy of SCST using svn. There’s a number of branches but we want the latest stable. So run “svn co https://svn.code.sf.net/p/scst/svn/branches/2.2.x scst” while the mockbuild user and in /home/mockbuild directory. This will
be the latest stable version of SCST which is 2.2.1.
b. Now that our user mockbuild has a copy of scst in his home directory, go ahead and cd into the unpacked kernel so we can patch it. Should be “cd ~/rpmbuild/BUILD/kernel-2.6.32-358.14.1.el6/linux-2.6.32-358.14.1.el6.x86_64/”.
c. We need to patch for SCST’s fifo vs lifo: “patch -p1 < ~/scst/scst/kernel/rhel/scst_exec_req_fifo-2.6.32.patch”
d. We need to patch for iscsi-scst’s put_page_callback: “patch -p1 < ~/scst/iscsi-scst/kernel/patches/rhel/put_page_callback-2.6.32-220.patch”
6. Time to compile the Linux kernel & install it.
a. Check your .config files (defualt one inside your ~rpmbuild/BUILD/kernel-*/linux-*/.config to your current kernel config in /boot/config-2.6.32-*) They shoud pretty much match. This means you can skip “make oldconfig” which would prompt you for stuff missing from your provided .config file with what this kernel you’re about to compile has as of now (meaning, if you’re compiling a newer kernel, your .config file is missing some stuff so it will prompt you for defaults and update your older .config file!)
b. Change the kernel name by editing the Makefile. We need to separate this kernel from the others by editing the EXTRAVERSION varible. Change it to “=-scst” version versus being just empty or blank.
c. Now run “make menuconfig” and change the following settings for SCST:
i. Select “Network support”->”Networking options” make sure “TCP/IP networking” is checked (should be) and check “TCP/IP zero-copy transfer completion notification” underneath so SCST will be notified when a transfer of data across the nic has finished. This way, it can hurry up & send the next block. Should speed things up.
ii. Next, verify that “Device Drivers”->”SCSI device support”->”SCSI disk support” is already checked. Again, for RHEL 6.4 it should be.
iii. Verify that “Enable the block layer”->”IO Schedulers”->”CFQ I/O scheduler” and “Default I/O scheduler” set to CFQ are both set. Again, they should be.
iv. Lastly, set “Processor type an features”->”Preemption Model” is set to “No Forced Preemption” versus Desktop mode.
v. Once done, save your config so we can compile this kernel.d. Once that’s done, we can compile it. Type “time make -j8 all” as the mockbuild user. This makes the kernel & modules while timing it and using all of your CPU’s cores (for me, I’ve got 8 cores so -j8!)
e. Now we need to install our new kernel. Do a “make modules_install” as root which will copy the modules over to /lib/modules/<kernel name> directory (you did call your kernel something different by setting the EXTRAVERSION variable right?) After it’s done, do a “make install” as root as well which will update the /boot directory & grub. Now update grub.conf so it will default to our new kernel upon boot up.
f. Once that’s done, copy over the current .config file in the /home/mockbuild/rpmbuild/BUILD/kernel-2.6.32-358.14.1.el6/linux-2.6.32-358.14.1.el6.x86_64 directory to the /boot directory and name it such that it matches your other config files in that directory (such as config-2.6.32-scst.)
7. Reboot your system so we can use the new kernel and compile scst off the new kernel source files.
8. Now we’ll compile SCST.
a. Go ahead and change the various Makefiles at once to release version by issuing “make debug2release” in the main scst directory. This will remove the debugging stuff. Do this as root. Also, since CentOS 6 now uses sysfs and not proc, we don’t have to do a “make enable_proc” like for CentOS 5.
b. Now go ahead and issue “make scst scst_install” as root in the mockbuild directory’s scst folder.
c. Issue “make iscsi iscsi_install” as root in your current folder.
d. Finally, issue “make scstadm scstadm_install” as well. This finalizes the compiling part.
9. Configure & start SCST.
a. Need to go ahead and tell our system to start it up automagically on bootup so execute “/usr/lib/lsb/install_initd scst” as root user.
b. Go ahead and either reboot to test it or “service scst start” to fire it up. (NOTE: We haven’t done a config file yet so it’s running w/ nothing up!)
c. Next, we need a simple config. Since I’m using actual RAID volumes as disks in SCST, I’ve gone w/ BLOCKIO devices and list them as /dev/sdX devices. You may want to use FILEIO devices instead or even a different device handler all together (scst_disk instead of scst_vdisk.) Here’s a couple of different examples:
i. dev_disk example which uses scst_disk:
HANDLER dev_disk {
DEVICE 3:0:0:0
}
TARGET_DRIVER iscsi {
enabled 1
TARGET iqn.2013-07.com.example.san1:iscsi-tgt1 {
enabled 1
LUN 0 3:0:0:0
}
}
ii. vdisk_blockio example which uses scst_vdisk:
HANDLER vdisk_blockio {
DEVICE disk01 {
filename /dev/sdb1
}
DEVICE disk02 {
filename /dev/sdc1
}
}
TARGET_DRIVER iscsi {
enabled 1
TARGET iqn.2012-09.com.example.san1:iscsi-tgt1 {
enabled 1
LUN 0 disk01
LUN 1 disk02
}
}
iii. vdisk_fileio example which also uses scst_vdisk:
HANDLER vdisk_fileio {
DEVICE mydisk01 {
filename /home/testdisk1
nv_cache 1
}
}
TARGET_DRIVER iscsi {
enabled 1
TARGET iqn.2013-07.net.spiderbird.san2:iscsi-tgt1 {
enabled 1
LUN 0 mydisk01
}
}
10. Finalizing your install:
a. Now that we’re done, it’s best to configure yum not to update your kernel w/ a newer one which would break all of your hard work. Modify your /etc/yum.conf file and add “exclude=kernel*” to it w/o the double quotes. This will help keep your system somewhat up-to-date w/o breaking SCST & your custom kernel.
11. Troubleshooting:
a. Keep in mind, if you’re going to use multiple SCST SANs in your backend, you need to make sure all of your exposed LUNs have different t10_dev_id values else your host will get confused and assume it’s seeing different paths to similar items. Also, using setup_id is supposed to help prevent this but evidently doesn’t work in version 2.2.x. You can skate around this issue by using different names for your defined DEVICEs (instead of using disk01 try using SAN1disk01.)
b. Pass through devices work as expected except for when that pass through device is a simple SATA drive. Your ESXi 5+ server still won’t put a VMFS partition on there because it isn’t reliable storage. Best to stick w/ RAID volumes in pass through mode instead.
c. I forget C….
Here’s another really good write up on installing SCST into OEL 6.5 from scratch by Gilbert:
https://sites.google.com/site/nandydandyoracle/home/scst-oel-6-5
Here’s a couple of links that I used during this write up:
Kernel compile links:
http://wiki.centos.org/HowTos/I_need_the_Kernel_Source
http://wiki.centos.org/HowTos/Custom_Kernel
SCST info regarding speed, settings & setups:
http://scst.sourceforge.net/max_outstanding_r2t.txt
http://scst.sourceforge.net/iscsi-scst-howto.txt
http://scst.sourceforge.net/vl_res.txt
http://sourceforge.net/p/scst/svn/4920/tree/branches/2.2.x/ (SCST SVN)
CentOS FAQ regarding install groups:
http://wiki.centos.org/FAQ/CentOS6#head-ef37a027209dcdba0f8f00cf2696721b774f74bf
A bunch of different write-ups for various Linux installations:
http://aliuhui.blogspot.com/2012/04/setup-iscsi-target-with-iscsi-scst-20.html Ubuntu …
http://jaysoncena.wordpress.com/2013/03/17/26/ generic..
http://temporalsolutions.com/linux-ha/scst-setup/ Ubuntu..
http://wiki.alpinelinux.org/wiki/High_performance_SCST_iSCSI_Target_on_Linux_software_Raid Alpine Linux
http://monklinux.blogspot.com/2012/02/scst-configuration-how-to-using-gentoo.html Gentoo
http://www.bauer-power.net/2012/03/how-to-install-scst-on-ubuntu.html Ubuntu..
http://www.kcsts.co.uk/blog/scst-iscsi Ubuntu again…
http://www.lessfs.com/wordpress/?p=850
http://www.lessfs.com/wordpress/?page_id=577
http://marcitland.blogspot.com/2011/03/accelerating-vdi-using-scst-and-ssds.html Gentoo
Here’s a number of links regarding iSCSI settings you can tweak and what they mean. These are primarily geared towards using your SCST installation with ESXi and MPIO:
https://communities.vmware.com/docs/DOC-15437
http://deinoscloud.wordpress.com/2010/08/19/vsphere-4-1-iscsi-advanced-settings-and-their-meanings/
http://forum.open-e.com/archive/index.php/t-2537.html (Tuning iSCSI settings)
http://virtualgeek.typepad.com/virtual_geek/2009/09/a-multivendor-post-on-using-iscsi-with-vmware-vsphere.html Best link I’ve found yet of tweaking your ESX iSCSI settings.
http://www.gatt-it.co.uk/1/post/2012/11/how-to-set-the-round-robin-iops-setting.html
http://forum.open-e.com/showthread.php?1542-VMWare-vSphere-Recommended-settings
https://forums.openfiler.com/index.php?/topic/4681-howto-definitive-esxi-41-configuration-guide/
I’ve recently done more thinking about Cisco’s NAT changes and wanted to jot down a couple of examples of solving NAT problems in both Auto NAT (Network Object NAT) and Manual NAT (Twice NAT.)
Branch Office example with one public static IP Address which is assigned to the outside interface of your ASA FW. If you need to do static NAT w/ port-address-translation to several internal servers on your DMZ (static PAT) you’ll find this one handy. If any of your servers need to have more than one port forwarded to the internet, I prefer to go w/ Manual NAT versus Auto NAT due to readability.
Example using Auto NAT:

object network myWebServer
  host 10.1.1.1
  nat (dmz,outside) static interface service tcp http http

object network myDNSServer
  host 10.1.1.2
  nat (dmz,outside) static interface service udp domain domain

object network myWebServer-01 // I've got to declare it multiple times??!! This feels WRONG!!
  host 10.1.1.1
  nat (dmz,outside) static interface service tcp https https

object network myEmailServer
  host 10.1.1.3
  nat (dmz,outside) static interface service tcp smtp smtp

Example using Manual NAT:

object network myWebServer
  host 10.1.1.1
object service http
  service tcp source eq www
object service https
  service tcp source eq 443

nat (dmz,outside) source static myWebServer interface service http http
nat (dmz,outside) source static myWebServer interface service https https
If you ask me, in this scenario, Manual NAT is a better solution vs Auto NAT. I’m rather disappointed that Cisco doesn’t allow group service objects to be used in Manual NAT yet but at least I’m not having to create bogus network objects multiple times when I’m using Manual NAT.
Here’s another example of using NAT at a small branch office when you’ve got 2 Public static IPs with one being used on the ASA’s outside interface and the other IP being used amongst multiple servers in a DMZ.
Example using Auto NAT:

object network STATIC209_165_201_11
  host 209.165.201.11

object network myDNSServerUDPDNS
  host 10.1.1.1
  nat (dmz,outside) static STATIC209_165_201_11 service udp domain domain

object network myDNSServerTCPDNS
  host 10.1.1.1
  nat (dmz,outside) static STATIC209_165_201_11 service tcp domain domain

object network myWWWServer
  host 10.1.1.3
  nat (dmz,outside) static STATIC209_165_201_11 service tcp http http

NOTE: See how we're using the 2nd public IP address vs. the outside's interface?

Example using Manual NAT:

object network STATIC209_165_201_11
  host 209.165.201.11

object network myDNSServer
  host 10.1.1.1

object network myWWWServer
  host 10.1.1.3

object service udpdns
 service udp source eq domain

 object service tcpdns
 service tcp source eq domain

object service tcphttp
 service tcp source eq http

nat (dmz,outside) source static myDNSServer STATIC209_165_201_11 service udpdns udpdns
nat (dmz,outside) source static myDNSServer STATIC209_165_201_11 service tcpdns tcpdns
nat (dmz,outside) source static myWWWServer STATIC209_165_201_11 service tcphttp tcphttp
To me at least, Manual NAT is more readable when starring at configs and tracking down bugs.
Here’s a couple useful links:
http://www.cisco.com/en/US/docs/security/asa/asa91/configuration/firewall/nat_overview.html
http://www.cisco.com/en/US/docs/security/asa/asa91/configuration/firewall/nat_objects.html
http://www.cisco.com/en/US/docs/security/asa/asa91/configuration/firewall/nat_rules.html
http://www.fir3net.com/Cisco-ASA/cisco-asa-83-no-nat-nat-exemption.html
http://www.fir3net.com/Cisco-ASA/cisco-asa-83-nat.html
http://tunnelsup.com/tup/2011/06/24/nat-for-cisco-asas-version-8-3/
http://packetpushers.net/understanding-when-a-cisco-asa-nat-rule-can-override-the-asa-routing-table/
http://www.cisco.com/en/US/docs/security/asa/asa83/upgrading/migrating.html#wp51777 (static NAT/PAT migration examples.)
http://www.cisco.com/en/US/docs/security/asa/roadmap/asa_new_features.html (Cisco ASA new Features by Release.)
http://www.cisco.com/en/US/products/ps6120/prod_configuration_examples_list.html (Some very good config examples from Cisco.)
http://www.cisco.com/en/US/docs/security/asa/asa83/asdm63/configuration_guide/nat_overview.html#wp1118157 (Cisco’s NAT Rule Table.)
I recently upgraded my ASA5505 to 9.1(1) and had heard while I was configuring my ASA5515-x that an interim release, 9.1(1)4 was available. When I started using the newer release a lot of my problems went away thankfully so I decided to upgrade to 9.1(1)4 on the ASA5505. Well sure enough, I encountered an error and instead of trying to debug it I fell back into my “Windows” experience and did a reload on the device instead.
It would POST no problems but got hung on “Bootloading” and stayed there. So I finally decided after an hour of powering it off & on to try and do a full recovery by using rommon. I already had the tftp server ready so how hard can it be to upload an IOS image to the device?? I mean seriously? WHAT COULD POSSIBLY GO WRONG…
I logged in to rommon and set the initial variables:
ADDRESS=192.168.1.1
SERVER=192.168.1.2
GATEWAY=192.168.1.2
IMAGE=asa911-4-k8.bin
PORT=Ethernet0/0
I then attempted to ping the tftp server which is on 192.168.1.2. No love. The tftp server couldn’t ping the ASA either. Well this isn’t going well at all! After about an hour of messing around w/ settings and verifying good link connectivity I finally just issues “tftp” on the ASA5505 and the image loaded! W00T! Now came the fun part! That image I loaded was only in memory and not installed on the compact flash card! In fact, it couldn’t see the compact flash card at all (which was the problem. Appears that my FAT file system went tits up!) So w/o thinking I issued “reload” again. And I was right back at “Bootloading…” screen. This go around, I issued the “erase flash:” command while inside the rommon. Downloaded the image again from the tftp server. Once again, the IOS image is loaded in memory. This time I issued “format flash:” and I now could configure my ASA5505 to once again download the image from my tftp server and write it to my compact flash. I also did some initial configuration and wrote to memory.
Next reboot, I was up and running minus a couple of important things:
1) I was missing my activation key. I thankfully had it over on Cisco’s website since I upgraded the device to Security Plus years ago so I fetched it from here: http://www.cisco.com/web/go/license and looked for my devices available licenses. Once found, I applied it in global config mode and issued another reload.
2) I uploaded my saved config which I had saved previously. Things weren’t working as I had expected. I had to log into interface config mode and issue my “no shut” commands to rectify that situation! 😛
3) I also needed to generate an RSA key pair for ssh with “crypto key generate rsa” in global config mode.
4) There was something else but of course I have forgotten that!
See the links below for other good reference material.
https://supportforums.cisco.com/thread/153353 ( no config-register in case you’re continously booting in rommon)
http://www.tech21century.com/using-the-rommon-to-load-a-new-image-on-cisco-asa-firewall/ (URL says it all.)
http://www.cisco.com/en/US/docs/security/asa/asa82/configuration/guide/admin_trouble.html#wp1076206 (using rommon)
http://www.gomjabbar.com/2011/07/17/recovering-a-license-activation-key-for-the-cisco-asa/ (again, URL speaks volumes)
http://evilrouters.net/2011/12/16/how-to-upgrade-license-cisco-asa-firewall/ (ditto)
http://www.gomjabbar.com/2011/07/31/cisco-asa-device-management-%E2%80%93-ssh-keys-and-fingerprints/ (ssh keys)