Office 365 and Windows Azure Dirsync part 1: Filtering AD User Objects
- October 9th, 2013
- Posted in Networking
- Write comment
At work we use Microsoft’s Cloud offering called Office 365. We were one of the early adopters and signed on with BPOS back in 2010 ish time frame. Even back then, they had an Active Directory Sync tool and each time we were upgraded from 2007 toolset -> 2010 toolset to now 2013 toolset we had to tweak our AD Sync tool to keep our GAL clean of disabled or service accounts. This wasn’t an easy feat initially but I was pointed in the right direction by MessageOps.com and have since managed to reapply the same filtering technique for Office 365’s new Dirsync tool called Windows Azure Directory Sync. We were pressed into upgrading our dirsync tool because they started blocking as of Oct. 1st 2013 the previous tool due to it being A) 32 bit and B) Microsoft Identity Lifecycle Manager 2007 fp1 at its core. They’ve now got us using Forefront Identity Manager 2010 R2 which has password synchronization! Yay! I managed to hold off implementing ADFS just long enough for Microsoft to find an easier way for our users to start using Same Sign-On.
So, how do you configure the new Dirsync tool so it won’t send every single AD User Object into Office 365? By filtering your Active Directory Connector Management Agent using miisclient.exe.
1) Open up your miisclient.exe and go to the Management Agents option.
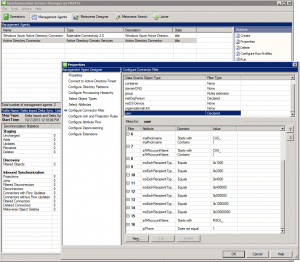
2) Next, right-click your Active Directory Connector listed under Management Agents and select properties.
3) Now select Configure Connector Filter and scroll down on the right-hand side until you find User. Here the user filter is declared thankfully so we can tweak it the way we want (unfortunately group is a Rules Extension which has changed and will be addressed in Part 2 of the write up.)
4) While user is selected, and you can see the 15 different filters for users, select “New…” across the bottom and create a filter appropriate for your organization. For ours, we selected attribute = ipPhone, Operator = Does not equal and Value = 1. This way, it will only synchronize AD User Objects that have their ipPhone = 1 on their AD properties page (this way I don’t have to use ADSI Edit for each user w/ in our company.)
All in all, pretty straight forward. Now fixing our groups that got sucked up into Office 365 are another matter!
Here’s a couple of links I found useful regarding setting up this new filter inside Forefront Identity Manager 2010:
http://www.messageops.com/documentation/office-365-documentation/office-365-admin-training (MessageOps website. Scroll to the bottom for Dirsync.)
http://social.technet.microsoft.com/wiki/contents/articles/18096.dirsyncwindows-azure-ad-password-sync-frequently-asked-questions.aspx (Dirsync FAQ.)
http://technet.microsoft.com/en-us/library/jj710171.aspx (MS’s steps for configuring filtering on Dirsync. I chose User Attribute Based filtering since we’re a small company and it was easier.)
http://technet.microsoft.com/en-us/library/hh967629.aspx (Top level of Dirsync. useful info if this is your first time using AD sync w/ Office 365.)
http://technet.microsoft.com/en-us/library/dn246918.aspx (Windows Azure Dirsync’s password sync feature. We definitely love it.)
http://blogs.technet.com/b/educloud/archive/2013/06/03/new-azure-active-directory-sync-tool-with-password-sync-is-now-available.aspx (Announcement that Azure sync now does passwords!)
http://support.microsoft.com/kb/2855271 (Password sync troubleshooting guide.)
http://community.office365.com/en-us/wikis/manage/2567.aspx?WT.mc_id=eml_CXM__Sept+2013+Admin+Newsletter (MS’s justification for making us bump up to 64 bit.)
http://blog.baeke.info/2012/06/24/office-365-identity-management-with-dirsync-without-exchange-server-on-premises/ (general Dirsync blog)